Vintage Australian Pink Jelly Coconut Cakes
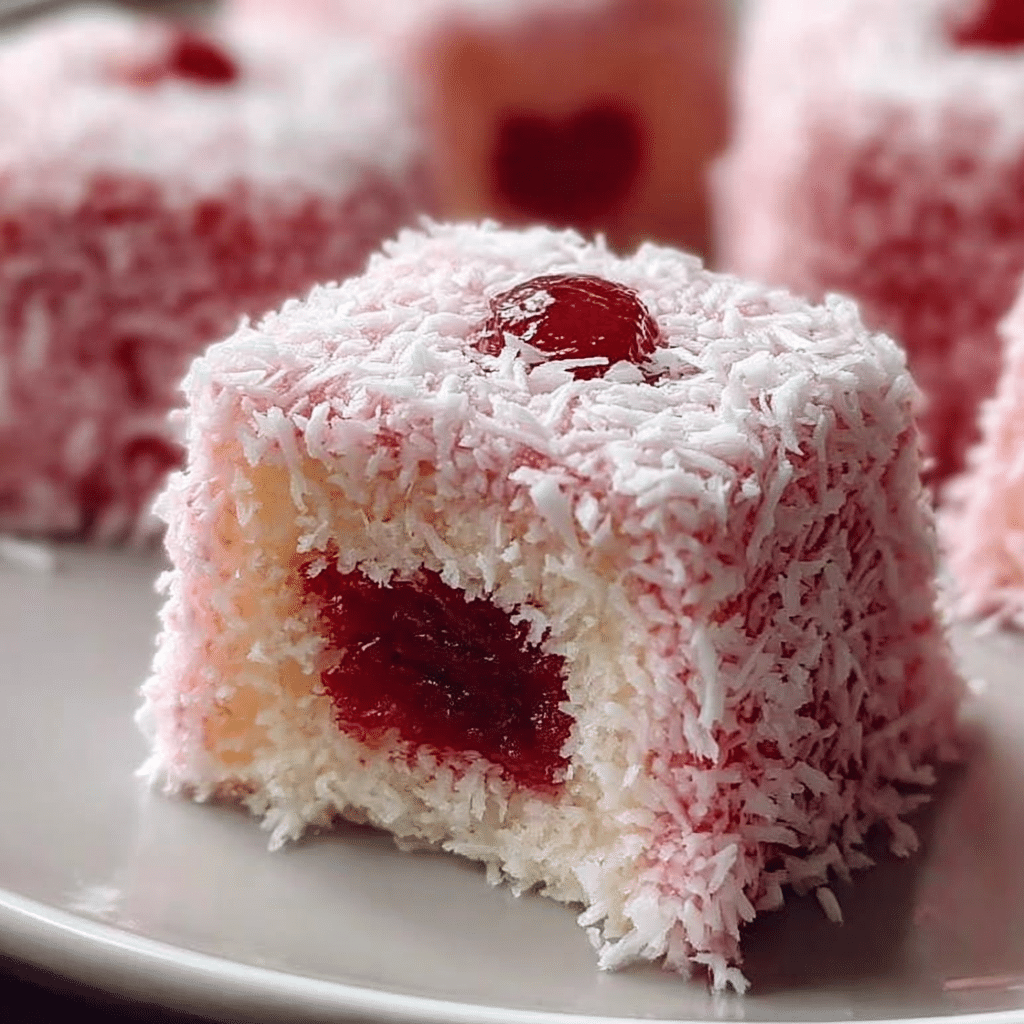
If you’re seeking a nostalgic treat that brings back the charm of classic Aussie kitchens, Vintage Australian Pink Jelly Coconut Cakes are exactly what you need. This retro dessert combines the chewy delight of coconut with the sweet, fruity burst of pink jelly, all layered in a way that’s as visually appealing as it is delicious. Whether you’re celebrating a special occasion or simply craving a scrumptious slice of tradition, these cakes perfectly capture the warmth and joy of vintage Australian baking.
Why You’ll Love This Recipe
- Timeless flavor combo: The mix of pink jelly and coconut offers a classic taste that’s both refreshing and indulgent.
- Simple to make: With straightforward ingredients and clear steps, it’s a breeze for beginner or experienced bakers alike.
- Eye-catching presentation: The pink layers and fluffy coconut topping create an irresistible look that impresses every time.
- Perfect for any occasion: Whether a casual afternoon tea or festive gathering, these cakes delight all ages and palates.
- Nostalgic comfort: Enjoy a delicious piece of Australian heritage that evokes fond memories and happy smiles.
Ingredients You’ll Need
The magic behind Vintage Australian Pink Jelly Coconut Cakes lies in its simple, wholesome ingredients. Each component plays a vital role: the jelly brings vibrant color and fruity sweetness, the coconut adds texture and aroma, and the base supports it all with a soft, spongey bite.
- Pink jelly mix: Use a good-quality flavored jelly, like strawberry or raspberry, to ensure vibrant color and burst of fruity flavor.
- Desiccated coconut: Provides a chewy texture and that unmistakable coconut aroma essential to the cake’s character.
- Sweetened condensed milk: Adds richness and helps bind the coconut topping beautifully.
- Butter: A necessary ingredient to create a moist and tender base layer with a buttery finish.
- Self-raising flour: Quickly rises to give your cake that classic soft crumb every bite craves.
- Castor sugar: Sweetens gently without overpowering the pink jelly’s fruity notes.
- Eggs: Essential for structure and a light, airy texture in the cake base.
- Boiling water: Used to dissolve the jelly mix for smooth layering and proper setting.
Variations for Vintage Australian Pink Jelly Coconut Cakes
Feel free to customize Vintage Australian Pink Jelly Coconut Cakes to suit your tastes or dietary preferences. This recipe is wonderfully versatile and adapts easily to twists that make it your own.
- Vegan twist: Substitute butter with coconut oil and use plant-based condensed milk alternatives for a dairy-free version.
- Different jelly flavors: Try lime or orange jelly for a zingy variation that still keeps the nostalgic feel.
- Toasted coconut topping: Lightly toast the desiccated coconut before adding on top to bring a warm, nutty crunch.
- Gluten-free option: Swap self-raising flour with a gluten-free baking mix to make it allergy-friendly without losing texture.
- Added fresh fruit: Fold in raspberries or strawberries into the base for a juicy surprise in every slice.

How to Make Vintage Australian Pink Jelly Coconut Cakes
Step 1: Prepare the Jelly
Begin by dissolving the pink jelly mix in boiling water according to package instructions. Pour the jelly liquid evenly into a lined tray and refrigerate until just set but still slightly tacky; this helps the next layers adhere perfectly.
Step 2: Make the Cake Base
In a mixing bowl, cream butter and sugar together until light and fluffy. Whisk in eggs one at a time, then gently fold in self-raising flour to maintain that airy texture. Spread the batter over the surface of the set jelly layer with care to avoid mixing layers.
Step 3: Bake the Base with Jelly
Place the tray in a preheated oven at 180°C (350°F) and bake for around 15–20 minutes, or until the cake base is golden and springs back lightly when touched. Allow to cool completely before adding the coconut topping.
Step 4: Prepare the Coconut Topping
Combine the sweetened condensed milk with desiccated coconut until fully incorporated. Spread this mixture evenly over the cooled cake base, smoothing the surface for an even finish.
Step 5: Chill and Serve
Return the tray to the fridge and let it chill for at least one hour, allowing the coconut topping to set beautifully. When ready, cut into bite-sized squares to showcase the stunning pink jelly layer beneath.
Pro Tips for Making Vintage Australian Pink Jelly Coconut Cakes
- Use fresh jelly: For vivid color and flavor, always prepare the jelly fresh rather than pre-made or bottled versions.
- Line your tray carefully: Using baking paper makes removing and cutting the cakes easier without any mess.
- Don’t overbake the base: Keep a close eye to ensure the sponge stays soft and moist, avoiding dryness.
- Cool thoroughly: Allow layers to cool completely before adding toppings to prevent melting or sliding.
- Chill properly: Adequate refrigeration is key to setting the jelly and coconut topping firmly for clean slices.
How to Serve Vintage Australian Pink Jelly Coconut Cakes
Garnishes
Add a sprinkle of extra desiccated coconut or a fresh mint leaf on each piece for a delightful finishing touch that enhances both flavor and presentation.
Side Dishes
Pair your pink jelly coconut cakes with a simple cup of English breakfast tea or a light fruit salad for a balanced tea-time treat or dessert spread.
Creative Ways to Present
Serve these cakes on vintage-inspired plates or stack them into beautiful tiers for parties, creating a nostalgic centerpiece that sparks conversations and warm smiles.
Make Ahead and Storage
Storing Leftovers
Keep your leftover cakes in an airtight container in the refrigerator. They stay fresh and flavorful for up to 3 days, maintaining the perfect texture and taste.
Freezing
You can freeze Vintage Australian Pink Jelly Coconut Cakes by wrapping them tightly in plastic wrap and placing in a freezer-safe box, lasting up to 2 months. Thaw thoroughly in the fridge before serving for best results.
Reheating
This cake is best served chilled or at room temperature, so reheating isn’t necessary and may affect the jelly’s set texture and coconut topping.
FAQs
Can I use a different type of jelly?
Absolutely! While traditional recipes call for pink jelly like strawberry or raspberry, feel free to experiment with flavors like lime or orange for a twist on this classic dessert.
Is it possible to make the recipe gluten-free?
Yes, swapping self-raising flour for a gluten-free baking mix works well and still produces a soft, delicious cake base.
How long does the jelly layer need to set before adding the cake batter?
The jelly should be just firm enough to hold its shape but still slightly tacky, usually about 1 to 2 hours in the fridge, which helps the cake batter stick perfectly.
Can I prepare these cakes vegan-friendly?
Definitely! Use plant-based butter, replace eggs with suitable alternatives like flax eggs, and opt for a vegan-friendly condensed milk substitute for a totally vegan treat.
What’s the best way to cut the cakes without them falling apart?
Use a sharp, warm knife (run it under hot water and dry before slicing) to achieve clean cuts that showcase the jelly and coconut layers beautifully.
Final Thoughts
There’s something truly special about Vintage Australian Pink Jelly Coconut Cakes. This charming recipe invites you to savor a beloved piece of Australian baking history with every bite. Whether you’re new to this dessert or revisiting a classic favorite, I encourage you to whip up a batch, share it with friends, and relish its sweet, coconutty, pink jelly goodness that’s as heartwarming as it is delicious.
Related Posts
Print
Vintage Australian Pink Jelly Coconut Cakes
- Prep Time: 20 minutes
- Cook Time: 20 minutes
- Total Time: 1 hour 40 minutes
- Yield: 16 servings 1x
- Category: Dessert
- Method: Baking
- Cuisine: Australian
- Diet: Gluten Free
Description
Vintage Australian Pink Jelly Coconut Cakes are a nostalgic, retro dessert combining vibrant pink jelly with a soft, buttery cake base and a chewy, sweet coconut topping. Perfect for any occasion, these visually appealing cakes capture the warmth and joy of classic Australian baking with a timeless flavor combination that is both refreshing and indulgent.
Ingredients
Pink Jelly Layer
- 1 packet pink jelly mix (strawberry or raspberry flavor)
- Boiling water (as per jelly packet instructions)
Cake Base
- 125g butter, softened
- 1/2 cup (100g) castor sugar
- 2 eggs
- 1 cup (150g) self-raising flour
Coconut Topping
- 1 cup (90g) desiccated coconut
- 1/2 cup (160g) sweetened condensed milk
Instructions
- Prepare the Jelly: Dissolve the pink jelly mix in boiling water according to the package instructions. Pour the mixture evenly into a lined tray and refrigerate until the jelly is just set but still slightly tacky to help the cake layers adhere.
- Make the Cake Base: Cream softened butter and castor sugar together until light and fluffy. Whisk in eggs one at a time, then gently fold in the self-raising flour to maintain an airy texture. Carefully spread the batter over the set jelly layer without mixing the layers.
- Bake the Base with Jelly: Bake the tray in a preheated oven at 180°C (350°F) for 15–20 minutes, or until the cake is golden and springs back lightly when touched. Allow to cool completely before adding the topping.
- Prepare the Coconut Topping: Combine sweetened condensed milk and desiccated coconut thoroughly. Spread this mixture evenly over the cooled cake base, smoothing the surface for an even finish.
- Chill and Serve: Refrigerate the cake for at least one hour to allow the coconut topping to set firmly. Cut into bite-sized squares before serving to showcase the vibrant pink jelly layer.
Notes
- Use fresh jelly made from powder and boiling water for the best vibrant color and flavor.
- Line your tray with baking paper to make removal and cutting easier and cleaner.
- Do not overbake the cake base to keep it soft and moist.
- Ensure all layers are completely cooled before adding the next to prevent melting and sliding.
- Chill sufficiently to set jelly and coconut topping for neat, clean slices.
Nutrition
- Serving Size: 1 piece (approx. 1/16 of recipe)
- Calories: 210 kcal
- Sugar: 18 g
- Sodium: 90 mg
- Fat: 9 g
- Saturated Fat: 6 g
- Unsaturated Fat: 2 g
- Trans Fat: 0 g
- Carbohydrates: 28 g
- Fiber: 1 g
- Protein: 3 g
- Cholesterol: 45 mg
Keywords: pink jelly coconut cake, vintage Australian dessert, retro jelly cake, coconut topping cake, gluten free jelly cake