No-Bake Snowman Truffles
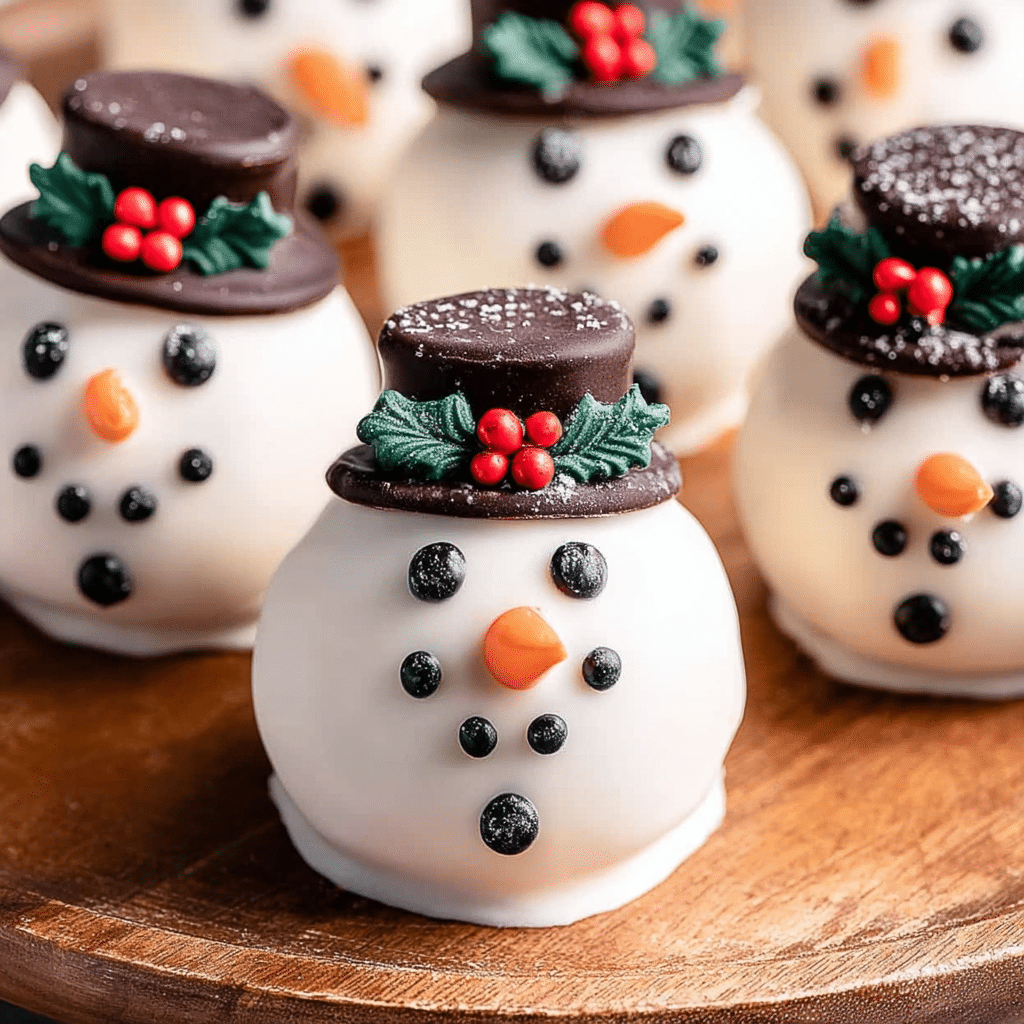
If you’re looking for a charming and delicious winter treat that’s as fun to make as it is to eat, look no further than these delightful No-Bake Snowman Truffles. Perfect for holiday gatherings, cozy nights by the fire, or a festive project with the kids, these no-bake delights combine creamy texture, sweet flavors, and adorable presentation in one easy recipe. No oven required, just simple ingredients that come together quickly to create winter magic on a plate!
Why You’ll Love This Recipe
- Effortless Preparation: No baking means less fuss and more time to enjoy the holidays.
- Kid-Friendly Fun: Decorating the snowmen is a delightful activity for children of all ages.
- Perfect for All Skill Levels: Whether you’re a baking pro or a newbie, this recipe is foolproof.
- Customizable Flavors: Easily tweak ingredients to suit dietary preferences or favorite flavors.
- Great Gift-Giving Idea: Wrapped up nicely, these truffles make adorable and tasty homemade presents.
Ingredients You’ll Need
Gathering simple, quality ingredients is key to achieving the perfect No-Bake Snowman Truffles. Each component plays a vital role—whether it’s adding sweetness, texture, or that snowy white appearance that brings the little characters to life.
- Cream Cheese: Acts as a smooth base that binds ingredients and provides creaminess.
- Powdered Sugar: Adds sweetness and helps create a perfect truffle consistency.
- White Chocolate Chips: Melted to coat the truffles, giving them a silky white finish.
- Vanilla Extract: Enhances overall flavor with a warm, aromatic note.
- Mini Chocolate Chips or Edible Markers: For creating snowmen faces and details.
- Candy Decorations (like orange sprinkles or colored sugar): Perfect for noses, scarves, or buttons.
- Crushed Graham Crackers or Toasted Coconut: Optional for rolling, adding extra texture and a subtle crunch.
Variations for No-Bake Snowman Truffles
One of the best parts about making No-Bake Snowman Truffles is how versatile the recipe is. Easily customize these sweet treats to suit dietary needs, seasonal themes, or just to throw in a new flavor twist.
- Vegan Version: Use vegan cream cheese and dairy-free white chocolate for a plant-based delight.
- Chocolate Snowmen: Swap white chocolate coating for milk or dark chocolate for a richer taste.
- Nutty Surprise: Mix in finely chopped nuts like almonds or pecans to add crunch inside.
- Fruity Flavor: Add a teaspoon of orange or peppermint extract for a seasonal twist.
- Gluten-Free Option: Ensure all ingredients, especially decorations, are certified gluten-free to suit all guests.

How to Make No-Bake Snowman Truffles
Step 1: Prepare the Truffle Base
Start by mixing the softened cream cheese with powdered sugar and vanilla extract in a bowl until you get a smooth, thick mixture with no lumps. This creamy base is what will hold your snowmen together perfectly.
Step 2: Shape the Snowmen
Using your hands (or a small scoop), roll the mixture into small balls for the snowman’s head and larger ones for the body. Stack the two balls carefully to resemble a snowman figure. Place them on parchment paper to chill and firm up for about 30 minutes.
Step 3: Melt the White Chocolate
Gently melt the white chocolate chips in a microwave-safe bowl in 20-second intervals, stirring in between to prevent burning. The melted chocolate will form the glossy white coat on your truffles.
Step 4: Dip the Snowmen
Carefully dip each stacked snowman into the melted white chocolate, using a fork or dipping tool, ensuring full coverage. Place them back on parchment paper to let the coating set completely—about 15 minutes in the fridge speeds this up.
Step 5: Decorate Your Snowmen
Once the chocolate sets, use mini chocolate chips, colored candy, or edible markers to add eyes, buttons, scarves, and noses. This is where the snowmen come alive with personality and festive cheer!
Pro Tips for Making No-Bake Snowman Truffles
- Chill the Mixture: Keeping your truffle base cold before shaping helps it hold together better.
- Use Parchment Paper: This prevents sticking and makes cleanup a breeze.
- Be Gentle When Dipping: Use a fork or dipping tool to avoid damaging the shape while coating.
- Work in Batches: Melt chocolate as needed to ensure it stays smooth and not too thick.
- Get Creative with Decorations: Use colorful candies or edible glitter to personalize each snowman.
How to Serve No-Bake Snowman Truffles
Garnishes
Add a sprinkle of powdered sugar or tiny edible snowflakes around the truffles on a decorative plate to enhance their winter wonderland vibe.
Side Dishes
Pair these truffles with warm hot chocolate or a spiced tea for a cozy, indulgent winter snack that balances sweetness and warmth.
Creative Ways to Present
Arrange your truffles standing in mini cupcake liners or on a snowy-themed platter. Add miniature scarves made of fruit leather or licorice for an extra crafty touch.
Make Ahead and Storage
Storing Leftovers
Keep No-Bake Snowman Truffles refrigerated in an airtight container for up to 5 days to maintain their freshness and shape.
Freezing
Freeze the truffles on a baking sheet first, then transfer to a freezer-safe container. They can be stored frozen for up to 2 months and thawed in the fridge overnight before serving.
Reheating
Since these are no-bake treats, avoid reheating. Instead, bring them to room temperature for about 15 minutes to soften slightly before enjoying.
FAQs
Can I use other coatings besides white chocolate?
Absolutely! Melted dark, milk chocolate, or candy melts in any color can be used to coat the truffles, giving you a fun variety of looks and flavors.
How do I make the snowmen stick together?
The cream cheese and powdered sugar base is sticky enough to hold the parts together, but chilling the shaped truffles before dipping helps them set firmly and prevents falling apart.
Are No-Bake Snowman Truffles gluten-free?
They can be, depending on the ingredients you use. Select gluten-free powdered sugar, decorations, and confirm your white chocolate is gluten-free to keep the recipe safe for gluten-sensitive guests.
Can this recipe be made ahead for parties?
Yes! These truffles hold up well in the refrigerator and even freeze nicely, making them perfect for preparing in advance and enjoying when guests arrive.
What can I use if I don’t have cream cheese?
You can substitute with mascarpone or a thick nut butter mixed with powdered sugar, though the flavor and texture will vary slightly from the original recipe.
Final Thoughts
No-Bake Snowman Truffles are a cheerful, tasty, and incredibly easy winter treat that feels just as special as any baked holiday dessert. Whether sharing with family, friends, or special guests, these sweet snowmen are sure to brighten up any day. Dive in and have fun decorating your own adorable winter treats—you’ll find it hard to stop at just one!
Related Posts
Print
No-Bake Snowman Truffles
- Prep Time: 15 minutes
- Cook Time: 0 minutes
- Total Time: 50 minutes
- Yield: 20-24 truffles 1x
- Category: Appetizers
- Method: No-Bake
- Cuisine: American
- Diet: Gluten Free
Description
No-Bake Snowman Truffles are a delightful and easy-to-make winter treat perfect for holiday gatherings and cozy nights. These creamy, sweet, and charming truffles require no oven, combining simple ingredients to create adorable snowman-shaped confections. Fun to decorate and customizable to suit various dietary needs, they make a perfect festive project and gift idea.
Ingredients
Base Ingredients
- 8 oz cream cheese, softened
- 1 cup powdered sugar
- 1 teaspoon vanilla extract
Coating
- 2 cups white chocolate chips
Decorations
- Mini chocolate chips or edible markers (for faces and details)
- Orange candy sprinkles or colored sugar (for noses, scarves, buttons)
Optional Rolling Ingredients
- Crushed graham crackers or toasted coconut (for rolling and added texture)
Instructions
- Prepare the Truffle Base: Mix softened cream cheese with powdered sugar and vanilla extract in a bowl until smooth and thick without lumps. This creamy mixture forms the base that holds the snowmen together.
- Shape the Snowmen: Using your hands or a small scoop, roll the mixture into small balls for the head and larger balls for the body. Stack the two balls to resemble a snowman and place on parchment paper. Chill for about 30 minutes to firm up.
- Melt the White Chocolate: Gently melt white chocolate chips in a microwave-safe bowl in 20-second intervals, stirring between each, until smooth and glossy for coating.
- Dip the Snowmen: Carefully dip each stacked snowman into the melted white chocolate using a fork or dipping tool, ensuring full coverage. Place back on parchment paper and refrigerate for about 15 minutes to set the coating.
- Decorate Your Snowmen: Once the coating is set, use mini chocolate chips, colored candy, or edible markers to create eyes, buttons, scarves, and noses, adding personality and festive cheer.
Notes
- Chill the truffle base before shaping to help it hold together better.
- Use parchment paper to prevent sticking and simplify cleanup.
- Be gentle while dipping to avoid damaging the snowman shapes.
- Melt chocolate in small batches to keep it smooth and workable.
- Get creative with decorations like colorful candies or edible glitter for a personalized touch.
Nutrition
- Serving Size: 1 truffle
- Calories: 90
- Sugar: 7g
- Sodium: 30mg
- Fat: 6g
- Saturated Fat: 3.5g
- Unsaturated Fat: 2g
- Trans Fat: 0g
- Carbohydrates: 8g
- Fiber: 0g
- Protein: 1g
- Cholesterol: 15mg
Keywords: no bake, snowman, truffles, holiday treats, winter dessert, easy recipe, kid-friendly, gluten free, festive sweets