How to Make Homemade Korean Rice Cakes Fast

If you have ever craved the chewy, slightly sweet delight of authentic Korean rice cakes but thought making them at home would be complicated, you are in for a treat. This guide on how to make Homemade Korean Rice Cakes fast will walk you through a simple, straightforward recipe that delivers the perfect texture and taste with minimal effort. Whether you want to impress your friends or simply enjoy a warm, satisfying snack, making these rice cakes from scratch is easier than you think and truly rewarding.
Why You’ll Love This Recipe
- Quick preparation: You’ll have fresh Korean rice cakes ready in under 30 minutes, perfect for busy days.
- Authentic texture: Achieves the chewy, tender bite traditional rice cakes are known for without fancy equipment.
- Minimal ingredients: Uses simple pantry staples that are often on hand or easy to find at your local store.
- Versatile base: The rice cakes can be customized or combined with a variety of toppings and sauces.
- Cost-effective: Makes a delicious treat that is budget-friendly compared to store-bought versions.
Ingredients You’ll Need
Keeping the ingredient list short and sweet ensures that the recipe stays approachable while delivering authentic flavor and texture. Each component plays an essential role, from providing structure to adding bite and subtle sweetness.
- Sweet rice flour (glutinous rice flour): The key ingredient that creates the chewy texture characteristic of Korean rice cakes.
- Water: Helps to hydrate the flour and form the dough, contributing to the smooth consistency.
- Sugar: Adds a gentle sweetness that balances the chewy starch in the rice flour.
- Salt: Enhances the overall flavor without overpowering the rice cake’s natural taste.
- Vegetable oil or sesame oil: Prevents sticking and adds a slight nutty flavor if sesame oil is used.
Variations for Homemade Korean Rice Cakes
One of the best things about Homemade Korean Rice Cakes is how easily you can tweak the basic recipe to suit your tastes, dietary needs, or even the occasion. Here are some fun and tasty ideas to personalize your rice cakes.
- Classic Tteokbokki style: Add gochujang (Korean red chili paste) and fish cakes for a spicy, savory treat.
- Sweet red bean filling: Fill or dip rice cakes in sweetened red bean paste for a traditional Korean dessert twist.
- Vegetarian option: Toss with stir-fried vegetables and soy sauce instead of meat-based sauces.
- Herbal infusion: Add finely ground mugwort powder to the dough for a fragrant, green rice cake variation.
- Gluten-free & allergy-friendly: Use 100% sweet rice flour and avoid cross-contamination to keep the recipe safe for sensitive eaters.

How to Make Homemade Korean Rice Cakes
Step 1: Prepare the Dough
Combine the sweet rice flour, sugar, and salt in a large mixing bowl. Gradually add water, stirring continuously to form a smooth, thick batter. The batter should resemble a thick pancake mix but without lumps. Add a teaspoon of oil to help reduce stickiness.
Step 2: Steam the Batter
Line a steaming tray with parchment paper or lightly oil a heatproof dish. Pour the batter evenly into the tray. Place in a steamer over boiling water and steam for about 20 minutes or until the rice cake is firm and translucent.
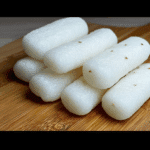
Step 3: Cool and Shape
Allow the steamed rice cake slab to cool for 10-15 minutes until safe to handle but still warm and pliable. Dust a clean surface with some sweet rice flour, then cut the rice cake into desired shapes — typically rectangles or thin strips for stir-frying.
Step 4: Optional Pan-Fry or Use in Recipes
If you want crisp edges, lightly pan-fry the cut rice cakes in a non-stick pan with a little oil over medium heat. Otherwise, you can use them immediately in recipes like tteokbokki or soup.
Pro Tips for Making Homemade Korean Rice Cakes
- Measure ingredients precisely: Balancing water and flour is critical for the perfect chewy texture.
- Use fresh sweet rice flour: The fresher the flour, the better the final texture and taste.
- Keep the dough covered: Prevent the dough from drying out by covering it with a damp cloth during preparation.
- Steam gently: Avoid opening the steamer frequently to maintain a consistent temperature and moisture level.
- Shape while warm: Working before the rice cakes fully cool makes cutting and shaping much easier without crumbling.
How to Serve Homemade Korean Rice Cakes
Garnishes
Freshly made rice cakes pair beautifully with sliced scallions, toasted sesame seeds, or a drizzle of toasted sesame oil to add aroma and richness right before serving.
Side Dishes
Serve your rice cakes alongside spicy kimchi, pickled radish, or a crisp Korean cucumber salad to balance the chewy texture with refreshing crunch and acidity.
Creative Ways to Present
Try layering the rice cakes in a clear glass bowl topped with vibrant gochujang sauce and a sprinkle of crushed seaweed flakes for a visually appealing, flavorful snack dish.
Make Ahead and Storage
Storing Leftovers
Place cooled, cut rice cakes in an airtight container and refrigerate for up to 3 days. Dust them lightly with flour to prevent sticking.
Freezing
Freeze uncooked or cooked rice cakes spread on a baking tray until solid, then transfer to a freezer bag for up to 1 month. This preserves their texture and flavor well.
Reheating
Reheat refrigerated or thawed rice cakes by steaming for a few minutes or pan-frying lightly until soft and warm again. Avoid microwaving directly to prevent toughening.
FAQs
Can I use regular rice flour instead of sweet rice flour?
Regular rice flour doesn’t have the same sticky qualities, so it will produce a more crumbly rice cake rather than the chewy texture expected from Homemade Korean Rice Cakes.
Do I need a special steamer to make these rice cakes?
No, a standard steaming setup works perfectly fine. You can use a metal strainer over a pot with boiling water or even a bamboo steamer – anything that allows steam to circulate evenly.
Can I make these rice cakes vegan?
Absolutely! The basic recipe is already vegan-friendly since it uses only flour, water, sugar, and salt without any animal products.
How long can I store homemade rice cakes?
Stored properly in an airtight container in the fridge, they last up to 3 days. For longer storage, freezing is recommended.
Are Korean rice cakes gluten-free?
Traditional Korean rice cakes made with sweet rice flour are naturally gluten-free, but always check packaging for cross-contamination if you have gluten sensitivities.
Final Thoughts
Making Homemade Korean Rice Cakes fast is an easy, satisfying kitchen adventure that brings a piece of Korean culture straight to your table. With just a handful of ingredients and simple steps, you’re set to enjoy delicious, chewy rice cakes anytime you crave that comforting, authentic flavor. Give it a try—once you taste your own fresh rice cakes, you’ll wonder why you ever bought them pre-made!
Related Posts
- Best Steak Tacos with Fresh Salsa & Avocado Recipe
- Creamy Tuscan Prawns with Spinach & Sun Dried Tomatoes Recipe
- Why Hot Honey Garlic Flatbread Pizza Is a Must-Try
Homemade Korean Rice Cakes
- Prep Time: 10 minutes
- Cook Time: 20 minutes
- Total Time: 30 minutes
- Yield: 4 servings 1x
- Category: Appetizers
- Method: Steaming
- Cuisine: Korean
- Diet: Gluten Free, Vegan
Description
Experience the authentic chewy texture and subtle sweetness of homemade Korean rice cakes made quickly and easily with just a few simple ingredients. Perfect as a snack or a versatile base for various toppings and sauces, these rice cakes bring traditional Korean flavors right to your kitchen in under 30 minutes.
Ingredients
Main Ingredients
- 1 cup sweet rice flour (glutinous rice flour)
- 3/4 cup water (adjust as needed)
- 1 tablespoon sugar
- 1/4 teaspoon salt
- 1 teaspoon vegetable oil or sesame oil
Instructions
- Prepare the Dough: Combine the sweet rice flour, sugar, and salt in a large mixing bowl. Gradually add water while stirring continuously until a smooth, thick batter forms, resembling thick pancake batter without lumps. Stir in a teaspoon of oil to reduce stickiness.
- Steam the Batter: Line a steaming tray with parchment paper or lightly oil a heatproof dish. Pour the batter evenly into the tray. Place it in a steamer over boiling water and steam for about 20 minutes, or until the rice cake becomes firm and translucent.
- Cool and Shape: Allow the steamed rice cake slab to cool for 10-15 minutes until it is warm and pliable enough to handle safely. Dust a clean surface with sweet rice flour, then cut the rice cake into desired shapes, typically rectangles or thin strips for stir-frying.
- Optional Pan-Fry or Use: For crisp edges, lightly pan-fry the cut rice cakes in a non-stick pan with a little oil over medium heat. Otherwise, use the rice cakes immediately in dishes like tteokbokki, soups, or enjoy as is.
Notes
- Measure ingredients precisely to ensure the chewy texture is just right.
- Use fresh sweet rice flour for the best texture and flavor.
- Keep the dough covered with a damp cloth during preparation to prevent drying out.
- Avoid frequently opening the steamer to maintain consistent temperature and moisture.
- Shape the rice cakes while warm for easier cutting without crumbling.
Nutrition
- Serving Size: 1/4 of recipe
- Calories: 120
- Sugar: 3g
- Sodium: 150mg
- Fat: 2g
- Saturated Fat: 0.2g
- Unsaturated Fat: 1.8g
- Trans Fat: 0g
- Carbohydrates: 25g
- Fiber: 1g
- Protein: 1g
- Cholesterol: 0mg
Keywords: Korean rice cakes, tteok, homemade rice cakes, gluten free, vegan snack, Korean appetizer